Showing posts with label #organization. Show all posts

8.20.2018

Organized Sewing

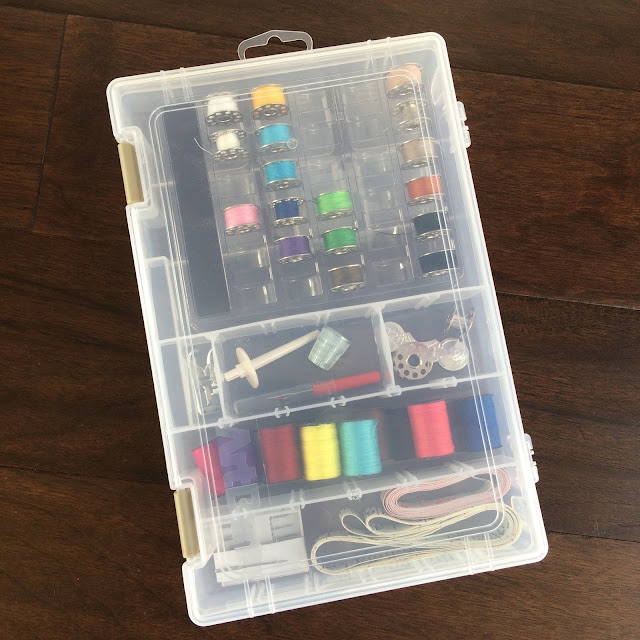
If you know me, I LOVE organizing...bits, bobbles, clothes, shoes, pantry items, toys, washi tape, etc. There are certain areas that get pushed aside until I just can't take it anymore. Sewing is a newer hobby of mine but I should really preface that with, I sew PAPER, not clothing. This bag of stuff slowly accumulated and I needed a better solution, so off to the store I went.

Organized Sewing - LeroyLime

You can find this ArtBin Sew-lutions box pretty much anywhere sewing supplies are sold, I think I picked mine up from Michael's, isn't the name catchy? Sew-lutions. Genius!

Organized Sewing - LeroyLime

I color coordinated my bobbins and added all the little bits to the clear lidded box and now my sewing stuff is much easier to untangle. My large spools of thread are still in their zip lock baggie, until I find a new solution but at least my bobbins are enjoying their color coordinated home.

Organized Sewing - LeroyLime

Link your sewing organizational tips and posts in the comments below, I'd love to check them out!

Organized Sewing - LeroyLime

2.25.2015

DIY Wrapping Station

DIY Wrapping Station

Who else is a total sucker for the $1 a roll wrapping 
paper at Target? I am! A place to store my rolls without
all the bent ends which was easily accessible was on my
to-do list and this wall needed a bit of color...

Found this open frame at an antique shop, although it's
not antique, it was perfect and snatched up for a great
price. A box of cup hooks, some mini metal rods
and a finished usable piece that isn't too shabby
to look at when coming down the stairs to the basement.

We already had the bar, hooks and buckets, so hung
a few for washi tape, stickers, etc. I moved the markers 
and scissors onto a high shelf in a closet, since we
still have littles and that would just be a catastrophe
waiting to happen!

A few jars for ribbon scraps and bakers twine. 
The green locker, which will be getting a paint face 
lift hopefully this summer, holds tissue paper, 
small boxes, bubble wrap and other packaging items.

DIY Wrapping Station

The metal rods have a small hole in each end and are 
easily removable when you need to change out the
rolls of paper. A small piece of washi tape is also
a great way to keep the paper from unrolling.

10.09.2014

DIY - Pantry Makeover


It all started on a scratch piece of paper...


The four large wire shelves just HAD to go. Whoever
can keep their pantry organized and clean with those,
high five! This girl just isn't a fan of wire.


I apologize for not taking a before photo...the wire 
shelves were removed too quickly and thrown to
the curb for trash pick-up.


The hubs spent two days on this project and we 
love the results!! The only thing we changed while
he was cutting and installing the wood was making an
extra pan/tray cubby, so we ended up with four instead
of three. Once we were able to visualize the gap, it just
needed an extra cubby.


Note to self: paint before, touch up later...
I was the painter and couldn't help but get paint
all over me. Obviously, I'm NOT a professional!


With the ceilings being high...putting a large shelf above
would be silly, since we wouldn't be able to get to it, so 
a skinny shelf proves to be the PERFECT spot for vases
since I still haven't opened the cupboard above our fridge yet.


and here it is in it's non cluttered glory!


Have you updated your pantry? Leave a link to your
pantry post in the comments below, we'd all love to see!

9.12.2014

LeroyLime Craft Room Reveal


 The BIG craft room reveal is finally here!!! 
I'm happy to say, the shop is now open again and off of vacation mode.
Moving is a far cry from vacation and it feels oh so wonderful to 
call a place home again...

without further ado, please excuse the photo overload
and enjoy my new crafty space!


My old desk, along the back wall. My handy hubby cut the
top down to fit the space and sanded off the dings and marks
from moving...I love the new vintage look of the corners and 
decided to not repaint it.


 The new desk is simple, huge and pretty much
pure awesomeness!! 5 X 5' top with two IKEA shelving
units as the legs and lots of storage, yipee!!


The punch board made it through the move and was
screwed directly into the studs...this bad boy is heavy 
without the punches on there but makes great use
of wall space. I picked up a few new buckets from IKEA
since we live near one again.


I bought these almost 9 years ago (my first Etsy purchase)
and they've been amazing for my ink pads. Keeps them all
accessible and in view so I can easily snag the color or colors
I'm working with at the time.


I love these little bars and picked up a few with the intent
of possibly using them in the space but not sure where or
what for. Once the ink pad holders were up, I needed
something to fill the space between them and voila!
The perfect place for scissors, adhesive and other items
I use on a daily basis.


These old DVD holders from IKEA have been my 
go to for stamp sets...if there's any advice I can give
about organizing a craft room, 
UTILIZE YOUR WALL SPACE!!
It's a must, products actually get used since
they are in plain sight and aren't stashed away,
clearly forgotten in a bin or box.


Filing cabinets for all of my 8-1/2 X 11" Cardstock


Clear glass jars for visible and cute storage!


I've had one bookcase for years BUT picked up
a second to even out my space. No worries, I had
plenty to put on the shelves! haha


If you use glitter or embossing powder, this is THE 
BEST way to store it. I keep a plastic spoon in each 
container and sprinkle on what is needed directly
over the container with all the extra falling back
inside. Pop the top back on and no mess to clean up!


A skinny IKEA shelf for my 12X12" Cardstock


A small spot between the windows was perfect
for this little shelving unit. My hubby just had to 
lop off a bit from the top molding so it would fit
and he aged it up with the sander.


A bright photo without my chair. I LOVE 
all the natural light that pours in.

What's your favorite part??


 If you need me, this is where I'll be planting my 
backside...off to get some paper cuts, my friends!

~~~~~~~~~~~~~~~~~~~~~~

Thanks for stopping by! I love reading your comments!
I reply to comments that have email addresses attached; 
so if you'd like me to reply, make sure you'd not a 
"no-reply blogger" or leave your email 
address with your comment
Thanks so much!


8.23.2014

Craft Room


We've had formal dining rooms before and find that
with small children, we don't use them as often as a kitchen
nook or counter space...so, meet my new 
LeroyLime Dining Room Craft Room!!

Our entire house was painted a cream/off white/beige
color...blah, right?? We chose Perspective CSP5, a
light and dreamy shade of grey.


and now for the organizing...hanging and tackling
the remainder of my craft boxes.
Stay tuned for the end result!


8.19.2014

Laundry Room

A new house...not a rental, 
not base housing, 
just means one thing...
time to make it ours!!


We started in the laundry room closet and added a yummy
half cedar wall, stained Driftwood, which came out a light
grey. I love the grain of the wood and knots 
showing through the stain. Perfectly imperfect!


Here's the wood, cut to size, laid out on our driveway
BEFORE

and AFTER

 Who doesn't love their very own handy man?!! 


 We owned the drawer pedestals, which worked great 
in our last four homes BUT since we don't have a room
and rather a closet this time, no place for dirty laundry, so...
a DIY pedestal, that three laundry baskets fit perfectly!


There was quite a bit of unused space in the closet with 
the funny cutout to the left of the washer, so the hubs
installed two shelves, perfect for storing laundry room
odds and ends.

A bit of yellow paint, which is also going in the 
baby room, brightened up the space even more. 
We love it so much, we just might take the doors off
since they don't really drown out noise...slats and all, ahem.


What's your favorite part of our new laundry space?
Have you updated your laundry room recently, 
add your link below, I'd love to check it out!


3.18.2014

My LeroyLime Workspace

Well, I guess you could say, you can't pinch me in my LeroyLime workspace, 
as my pop of color amidst all the white is non other than GREEN!!

and since Spring is right around the corner, a bit of organization inspiration
for you all - sit back, check it out, enjoy & pop over if you want to create
or just gab over a cup of coffee!


I'm not going to lie...my desk RARELY looks like that
but I just moved a few things to a folding table I use every
now and again when I have large projects I'm working on.

My carpet is either littered with baby toys or cleared for 
my workouts. Where I'm standing to take the photos, 
there isn't a wall, it's an open room, which makes it a nice
space for me to work. I can still be present, not hidden 
away and my kiddos are extremely good about keeping
their tiny paws off Mama's goodies!

I'd love to hear what you think...comments with any questions
you have about something you're struggling with organizing in
your craft room or home. I'd love to help!

2.05.2014

How to Organize Glitter and Twine with Washi Tape


I've been starting to not like my bookshelf lately, so decided to do
a bit of cleaning, organizing, purging and prettying it up a bit. 

I've had a few rolls of bakers twine in these handy shaker glass cups 
for awhile now...but have entirely way too many rolls of twine to contain
each one, so I picked a few of my 'go-to' colors and added a bit of coordinating 
Washi Tape to jazz up the jars a bit. I love how the rolls stay nice and neat and
you can pull out as much or as little as you need. I tried using the large sugar
shaker jars like this but found that the twine would get caught and I ended up 
just ripping off the little sugar flap anyway. 


I also was tired of my old labeling system for my Embossing Powder
and Glitter. I used to have a hanging tag attached on each corner but 
they would get flipped or bent in moves...so when in Rome (or Minot)
what better time to #Washi than now, right?!

I pulled out a tiny set of letter stamps, and inked them up with 
Black Momento Ink. To get a nice straight stamped word, I
ripped off pieces of Washi Tape and placed them on a glass
cutting board. The Washi peeled off perfectly and stuck
straight onto the little reusable plastic containers. 

Each container has it's own plastic spoon for ease of shaking
the embossing powder or glitter onto whatever image I'm working
on at the moment. The extra powder or glitter is easily tapped
 off and falls right back into the container, no mess, no fuss!


 I've almost finished with the rest of the shelves and love
how 'pretty' they look now! 

How do you store your bakers twine? Embossing Powder? or Glitter?
I'd love to see!

5.01.2013

Organize Your Drawers


With two months left before the baby...I've gone into full nesting mode. Deep cleaning everything in my path, although it's taking me longer since naps are a must a few times a week! 

Here's a photo of the top drawer in my bathroom, a bit chaotic but I repurposed two vintage green cups I had in my craft room for bobby pins & hair ponies, took out items I no longer use and voila, something worth opening daily!


As minuscule as one organized drawer is, if you set your mind to working hard at one room a day (even if the rest of the house isn't up to par) eventually you'll get through it all. Just don't lose steam 1/2 way through. Then when summer finally rolls around, you'll be able to enjoy those warm months outside with your kiddos instead of cooped up inside cleaning and purging! 

Happy organizing!!