This is the second time I've made over this curbside find,
that I threw into the back of my car when we lived in
Newport, Rhode Island. You can find my first post HERE.
I am over the moon with how this turned out and
can't wait to get started on my next paint project!
First I sanded off the stenciled design off the top.
I wanted to make sure the top would have a smooth
surface and not leave a flower impression once I was
finished painting. It's the only portion of the piece I
actually sanded since I knew I would be using the
ever-forgiving chalk paint.
I'm also partial to foam brushed when applying chalk
paint, they are inexpensive and I love that I can squish
them into small areas if needed.
This is after the first coat of Americana Decor
Chalky Finish "Yesteryear". It's a beautiful pale
grey color, which I love...but I was going for a
different look to coordinate with the bathroom
mirror where this piece was to reside.
I pulled out my Waverly Wax in Antique and started
applying it with an old t shirt. If you don't want your
dark wax to look so dark, apply a clear wax first.
I quickly wiped on the Antique, working with one
side of my piece at a time. One I'd finish applying,
I'd start wiping off the wax and rubbing it in, till
I achieved the more worn look.
This is after the Antique Wax has been applied
everywhere. You can see that I didn't put wax
inside on the bottom sections. I had a different
idea for the inside...since the top piece normally
would've held a drawer which was broken
when I first picked up the piece. There was a
funny little lipped section that I wanted to make
smooth....
Before I get to the insides:
Here are two easy clean up musts.
1. Wipe top of containers with a damp
paper towel, so you can easily unscrew
the lid again.
2. Wear gloves so your hands don't look
as fantastic as mine did when I finished!
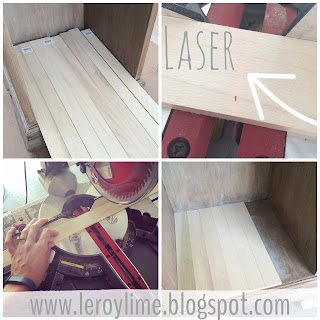
Here is my fix for the bottoms of the insides...
little pieces of wood. I was going to use paint sticks
but Home Depot was out of the large ones. I found
the next best thing and my hubby introduced me to
the saw, watch out world!
I cut them all to fit using the cool little laser light
and that sassy blade and I'm proud to announce,
I still have all of my fingers!
The back corners of the top section had these little
pieces that stuck up, so my DH helped me cut the
notches out for those pieces to fit inside.
My sweet helper, Satine...she loves her Mama
and I can always count on her to be nearby.
Next I pulled out my Americana Decor Chalky Paint
Everlasting, a nice bright white. Painted all the small
wooden cut pieces and let them dry. After a second
coat I quickly sanded them down a bit to make sure
they were nice and smooth on the edges and tops.
A bit of Elmer's Wood Glue and some golf balls
did the trick for easy installation of the wooden
pieces and then only one step to go...
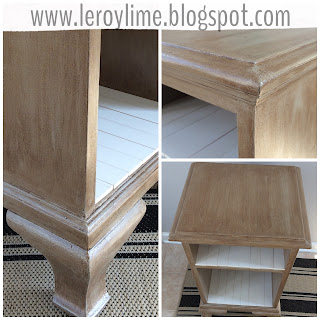
Just one coat of Minwax Polycrylic Clear Satin
protective finish and I'm proud to say this beauty
is done!!
Here she is in our half bathroom holding
a few bathroom essentials...
~~~~~~~~~~~~~~~~~~~~~~~~~~~
Please view my Linky Fun tab at the top of
the blog to see a few of the blog parties I like to join!


